As I described in another post, I wanted to test RAID technology on my GNU/Linux OpenSUSE configuration. In the previous post, I have shown how to create/install the RAID array.
Now my intent is to see what happens when a hard drive fails, as it is supposed to protect me against it. But I prefer to test rather than believe the hype. Just after that I will need to observe what happens when we plug a new drive to replace the failed one. And I will suppose that once again it’s a different drive (after a few years of operation and a failure, there is no reasonable chance of finding an identical drive).
Objectives
The first thing to do is to simulate a hard disc failure (I did not have the opportunity to wait a few months or a few years years to see this actually happening). So, I just decided to unplug one of the two disc drives of the RAID array.
Just to be sure that we understand the operation, a RAID array is supposed to accept this with transparently keeping on the normal operation (both the drives hold the same data in RAID-1 and apart from the reduced security after one failure, the other still is able to operate normally). Of course, in this situation we are expected to replace the failed drive by a new one in order to restore the normal RAID-1 operation.
I want to be sure that:
- The operation is not perurbated too much.
- The new disc insertion is detected as a repair.
- The repair can be done with minimal perturbation; The system is restored to full operation without needing some specific backup operation.
Hard disc drive failure
The first thing I did was checking if I could remove one of the discs from the YAST configuration center of OpenSUSE. As I should have expected, it immediately recognizes that this is not a normal operation and nothing is possible (except removing the RAID array first, which is certianly not my intention). So, I went back to the normal way: I stopped the computer and physically unplugged one of the hard disc drives , expecting the RAID software to recognize that something is really wrong in the array. This should be a representative simulated disc drive failure.
Booting the computer led to an apparently working computer. Everything semeed fine (except one cryptic message about executing a qt command, which seems to be unrelated since it did not occur on the subsequent boots). Moreover, the /secure directory (holding the RAID array is still operating quite normally without one of the two discs). So, the first goal when using the RAID array (ensuring that the failure of one disc does not stop the overall operation of the computer) is reached. But, I am quite worried at the fact that nothing is said clearly about the failure of the hard disc and the need to replace the failed drive.
Nevertheless, if I use the cat /proc/mdstat command line, I could easily observe the new status of the RAID array: It is using only one disc now instead of 2, as can be seen below.
leakey:/secure # cat /proc/mdstat

Personalities : [raid1]

md0 : active raid1 hdb1[0]

16458496 blocks [2/1] [U_]
unused devices:
leakey:/secure #
In order to help in the comparison, here comes the normal answer to this same cat /proc/mdstat command (on a still-safe RAID array):
leakey:/secure # cat /proc/mdstat

Personalities : [raid1]

md0 : active raid1 hdd1[1] hdb1[0]

16458496 blocks [2/2] [UU]
unused devices:
leakey:/secure #
Additionally, I decided to go and check the status of the RAID array from the YAST configuration tool. Here is the way things look:
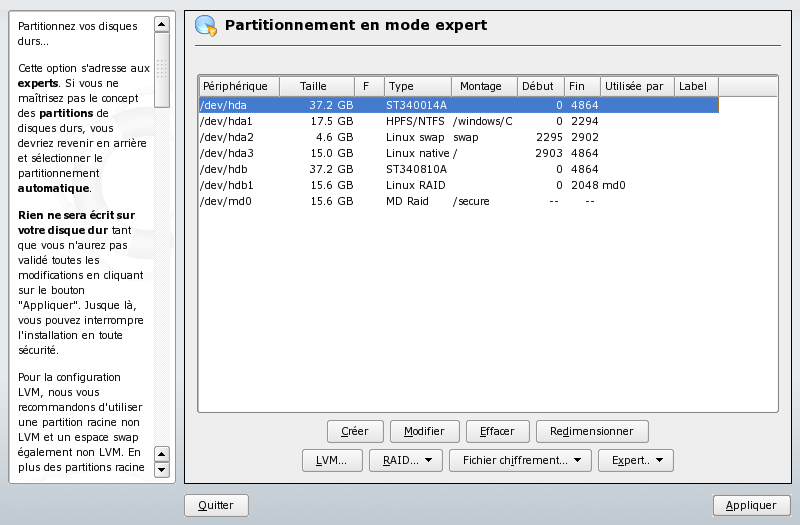
And I have to admit that the lack of one disc is nearly not noticeable either. A solution to this should be built somewhere else and may come in a separate post/article (keep reading this web site).
Using the partially-failed RAID array
Just to be sure that everything was right, I could immediately use with some heavy work (copying a large number of data files to the RAID array). It is obviously not sensible to the new situation. Essentially, it operates as if it was a normal disc drive (but without the security that a RAID configuration is providing, of course).
Repairing the RAID array
The next step being to try and repair the array with a new drive, I re-inserted the disc drive in the system and booted the computer. The first thing that was re-assuring was that the drive was not automatically re-inserted into the RAID array (it’s a processus that is better managed under human control rather than in fully automatic mode).
Going to the YAST configuration tool and starting the Partition tool, I got the following status information that is showing the new hard disc drive I had inserted (you may have to reboot in order to see the added drive):
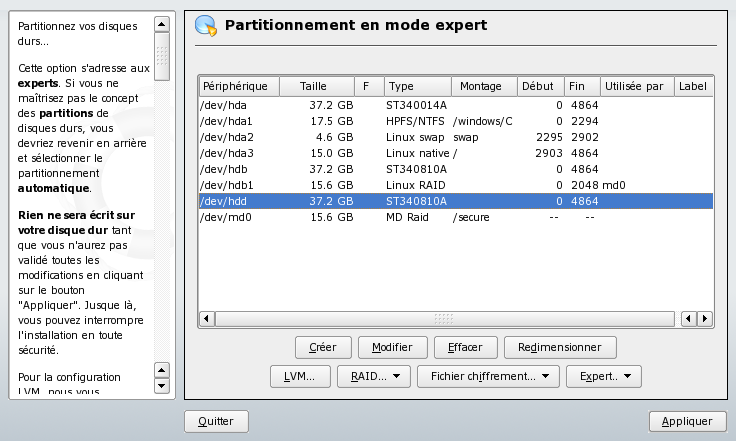
The newly added /md/hdd drive is quite visible here, but there is no easy/obvious way to insert the new disc drive from this point.
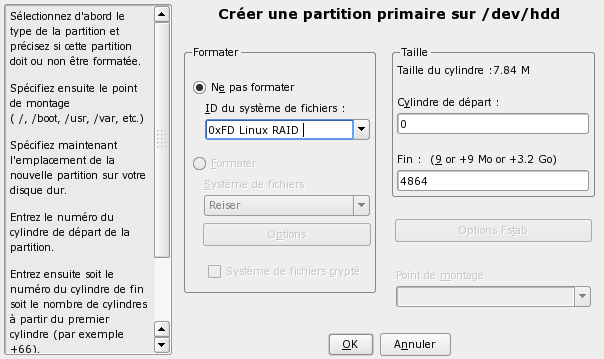
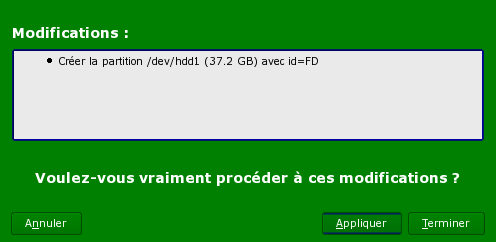
Actually, after looking around on the web, I found the right approach to insert it into the /md/hdd RAID array. First, you need to partition it with the auto-RAID partition (as we did when we created the original array). So, click on the Create.../Créer... button and select the /dev/hdd drive that you want to partition. Choose to create a Primary partition and
This leads to a newly available drive for a RAID array as can be seen on the display appearing immediately:
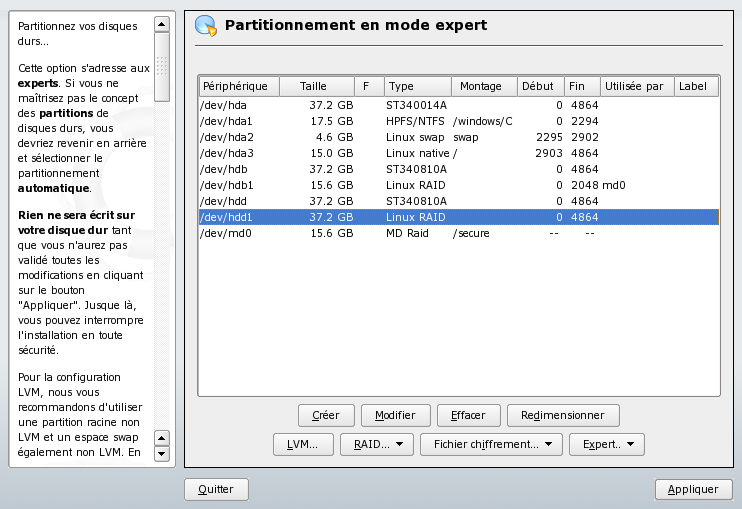
As you can see, the /dev/hdd1 drive is not yet attached to the md0 array.
Now, unfortunately, it seems that YAST is not able to modify on-the-fly the RAID array. Everything I tried led to error messages asking me to re-create it from scratch (not good since it would wipe my data). So, I just decide to Apply/Appliquer the changes and leave YAST to go back to a command line window.
Going to the command line allows to run the adequate command. Aptly named, it is raidhotadd.
leakey:/secure # /sbin/raidhotadd /dev/md0 /dev/hdd1

leakey:/secure #
Note that you may have to log as root to apply this command. You know that this works because you get no error message and your drives start running (the red blinking LED lights up and stays on for a relatively long time – while the array is rebuilt). If you want more visibility, you can use the command line again:
leakey:/secure # cat /proc/mdstat

Personalities : [raid1]

md0 : active raid1 hdd1[2] hdb1[0]

16458496 blocks [2/1] [U_]

[==>.................]  recovery = 13.8% (2282816/16458496) finish=9.3min speed=25145K/sec
unused devices:
leakey:/secure #
The above shows the array being rebuilt (13.8% progress). Below you can find what is presented if or when the array has been fully built.
leakey:/secure # cat /proc/mdstat

Personalities : [raid1]

md0 : active raid1 hdd1[1] hdb1[0]

16458496 blocks [2/2] [UU]
unused devices:
leakey:/secure #
But, if you don’t want to be bothered with this, just wait and look at the red disc light. When it goes back to normal (when it is no longer continuously lit in red), the operation is finished and you can use the RAID array.
Conclusion
Concluding this test, we got a RAID array correctly repaired. It has been rebuilt without loss of data and with minimal impact on the operation.
We learned two things from this experience:
- Disc failure has no perceptible impact on the operation of the RAID-1 array. The data is safe from the failure.
- Reparation of the RAID-1 array is visibly a slightly more difficult task with GNU/Linux software RAID, but it is feasible and there is always the easy solution of creating again a RAID array after backing-up/protecting the data.
Thus, it is quite easy to protect your data from some hardware failure but GNU/Linux software RAID seems rough when repair time has come (at least it’s true for OpenSUSE 10). Or at least rougher, than the equivalent in a hardware RAID configuration. Let’s hope that this will be improved in the future.
Leave a Reply